
Payments & Financials
How to Create an Invoice
Create a manual invoice with a client, dates, line items, taxes, and optional online card payment.
Manual invoices are created under Financials > Invoice and tracked with wedding, shooter, or other invoices.
Open the invoice form
- 1.
In the left navigation, expand Financials.
- 2.
Select Invoice. You can remain on All; opening Other first is not required.
- 3.
Select Create invoice in the upper-right corner.
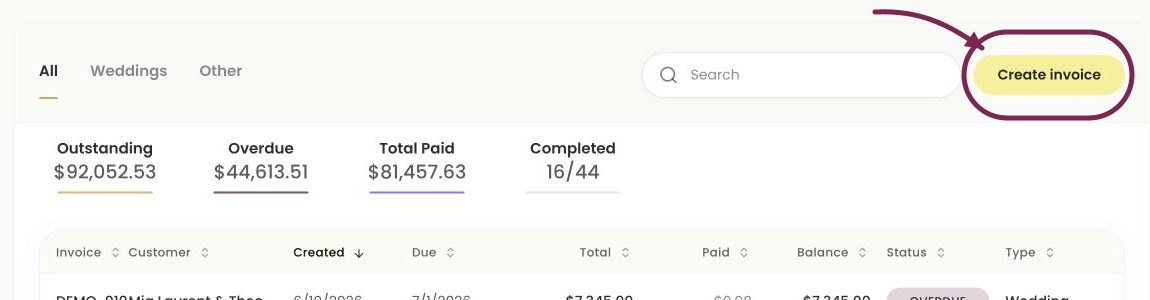
Select Create invoice - 4.
In Create invoice, start with the client details.
- 1.
Select or create the client
- 1.
Open Select a client and choose the client.
- 2.
If they are not listed, select New customer and add their details.
- 3.
Check the client’s name. Reopen the menu to change it if needed.
- 4.
Enter the client’s Email address.
- 1.
Set the invoice dates and description
- 1.
Set the Issue date.
- 2.
Set Due date to the day payment is due.
- 3.
Enter a short Description of work, such as the event or service being invoiced.
- 4.
Check the client and dates before adding charges.
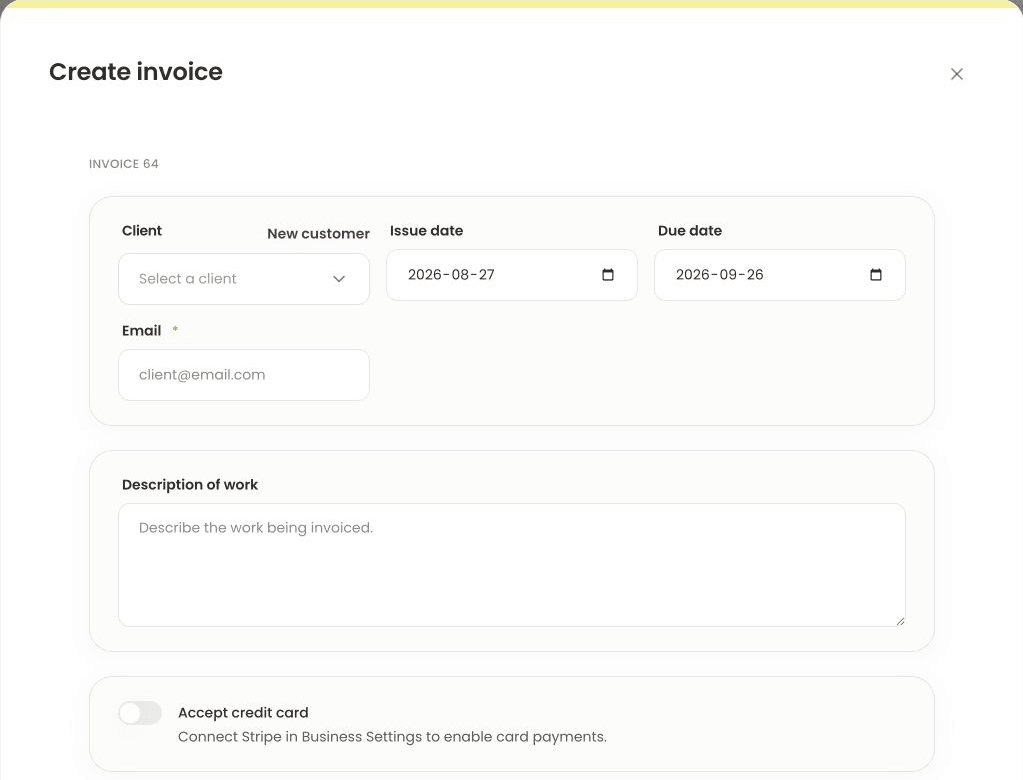
Client, email, dates, and description
- 1.
Add each charge
Add a line for each product or service:
- 1.
Enter the product or service name under Item.
- 2.
Enter Qty. Use 1 for a flat-fee service.
- 3.
Enter the per-unit Price and confirm the calculated Amount for that row.
- 4.
Select Add custom item for each additional charge.
- 5.
Remove any blank or accidental row before continuing.
- 1.
Review tax and the final total
- 1.
Confirm the Subtotal equals the combined line-item amounts.
- 2.
Review Taxes. Select Override tax only when this invoice needs a different tax treatment from the saved business default.
- 3.
Confirm the final Total after any tax change.
- 4.
If the total is wrong, return to the line items and correct the quantity, price, or tax before saving.
- 1.
Choose whether to accept a card payment
- 1.
Turn on Accept credit card only when online card payment should be available for this invoice.

Accept credit card setting - 2.
If the switch is unavailable, check the Stripe connection in Settings > Business.
- 3.
Leave it off to accept payment another way.
- 4.
Check the payment choice before saving.
- 1.
Save the invoice
Saving does not email the invoice to the client.
- 1.
Select Save invoice.
- 2.
Return to the invoice list and open the newly created row.
- 3.
Confirm the client, issue date, due date, total, paid amount, and balance.
- 4.
Use Open live invoice to review the client-facing page before sharing it.
- 5.
Confirm that Edit, Download PDF, Open live invoice, and Record payment are available as expected.
- 1.
Notes
- Creating or saving an invoice does not automatically email the client.
- The Accept credit card toggle is unavailable until Stripe is connected in Settings > Business.
- If the form reports a missing required field, return to that field instead of changing unrelated invoice details.