Help Centre
Welcome to the Help Centre!
We’re here to make things easy. Explore our tutorials and guides to get the most out of Lemlii. If you’re stuck or just curious, dive in—we’ve got you covered!
Dashboard
The Dashboard provides an overview of your business. Here’s what you’ll find:
-
Profit year-to-date, annual revenue, and expenses.
-
Bookings percentage showing progress toward your goals for the current and following year.
-
Lead conversion bubble comparing inquiries to bookings.
-
Source of leads pie graph (click to toggle to source of bookings).
-
Inquiries received for the last thirty days (compares to last year after one year of usage).
-
Upcoming events for the next thirty days.
-
Notifications tracking due projects, outstanding proposals, and overdue payments.
This page helps you monitor your progress, track trends, and stay on top of tasks.


Clients
Leads
The Leads page is your hub for managing inquiries and staying organized. Here’s what you’ll find and what you can do:
-
See all leads from your inquiry form (embedded on your website and social media) or manually add leads here.
-
Each lead shows key details: couple's name, wedding date, venue, inquiry date, and lead status.
-
If a lead’s wedding date conflicts with a date you’re already booked (or blacked out), an orange info icon will appear beside the wedding date. Hover over it to see the couple you’re already booked with or confirm that the date is unavailable.
-
Click on a lead to view more details, like the source and the inquiry message.
From this page, you can:
-
Send a proposal directly by selecting Proposal within a specific lead. This pulls from the Templates, Packages section where you’ve set up your collections.
-
Send an email by selecting Send Email. This opens your default email app (like Apple Mail) with a pre-filled template, including the couple’s name and their inquiry message. You can customize the email before sending. (Note: This requires a default email client to be set up on your computer.)
-
Update the lead’s status to track their progress:
-
Inquiry: Default status for all leads.
-
Meeting: Manually update if you’ve scheduled a meeting.
-
Pending: Automatically updates when a proposal is sent.
-
Booked: Automatically updates when a proposal is signed.
-
This page keeps you in control of your leads, helping you easily track availability, communicate with couples, and manage where each lead stands in your booking funnel!
Bookings
The Bookings tab is where all your confirmed clients are organized. At the top, bookings are sorted into three categories: Weddings, Other and Blackout.
-
Weddings: Displays all wedding bookings, sortable by year.
-
Other: Contains bookings for non-wedding work.
-
Blackout: Contains dates that the Lemlii user does not wish take on work.
For each booking, you’ll see important details:
-
Couple’s name, wedding date, venue, source of booking, inquiry date, and status.
-
Statuses reflect progress after the wedding date: Upcoming, Backlog, Working on it, Sent, and Downloaded. This syncs with the Projects tab for seamless project management.
-
View payment schedules
From this page, you can:
-
View and update invoices and mark payments as paid (links to transactions)
-
Open the couple’s proposal.
-
Access the couple’s video gallery if it’s already been sent.
-
Add or review notes for each client.
Projects
The Projects tab is your visual Kanban board for managing post-wedding workflows, with most movements automated thanks to Lemlii’s integrations.
Here’s how projects move through the four stages:
-
Backlog: Couples are automatically moved into the Backlog after their wedding date has passed.
-
Working on it: If you're sending galleries in chronological order, the next project will automatically move here. Otherwise, you can manually drag a project into this section when you begin working on it.
-
Sent: Once you create a video gallery and hit Copy on that gallery, the project is automatically moved to Sent.
-
Downloaded: When the client downloads their video gallery, the project is automatically moved to Downloaded.
Due dates are also tracked automatically:
-
Within 30 days of a due date, an info icon appears on the project card.
-
Hover over the icon to see how many days are left—or how many days it’s past due.
The Projects tab syncs directly with your Bookings, so there’s no need to manually add clients here. You can also drag and drop projects between stages for manual adjustments.


Delivery
Create
The Create section within Delivery is where you can create polished video galleries or simple links to send videos to your clients.
Here’s the difference between the two:
-
Gallery: A visual, polished presentation with customizable options like background images and titles—perfect for delivering a wedding gallery as the finished product.
-
Link: A quick and simple way to share files—ideal for sending individual videos or raw footage.
Creating a Gallery
-
Attach the gallery to a client. This links the gallery to the Projects tab, helping track Sent and Downloaded statuses.
-
Customize the gallery:
-
Add a background image to make the gallery visually appealing.
-
Create a title and optional subtitle.
-
Choose how long the Download button will remain active (30 to 365 days).
-
Set privacy options, such as password protection.
-
-
Add videos to the gallery:
-
Embed videos: Add links from YouTube or Vimeo to allow clients to view videos directly within their gallery page.
-
Upload videos: These are the final downloadable keepsakes for your clients. Uploaded videos count toward your storage limit, which determines your plan tier (Starter vs. Pro).
-
Creating a Link
-
Simply upload your video.
-
Generate the link to share with your client.
View
The View section within Delivery is where you manage your active galleries and links.
Features
-
Year-based sorting: Quickly find galleries and links by selecting a specific year at the top.
-
Storage indicator: See how much storage you’re using based on your plan tier (Starter or Pro).
-
See if your galleries have been downloaded at a glance (orange checkmark)
What You Can Do
-
Click into any gallery to:
-
Edit details like the title, subtitle, or background image.
-
Add or update videos (both embedded and uploaded).
-
Adjust privacy or download settings.
-
-
Use this page as a visual representation of all your active galleries and links, making it easy to keep track of what’s currently live.


Templates
Packages
The Packages section within Templates helps you create and organize the services you offer to clients. These packages are directly linked to the proposals you send, so setting them up here ensures you have everything ready when creating a proposal.
Collections
When you click Packages, you’ll first see your Collections. These are groupings of packages that you can customize based on event type, year, or any other category. Examples include:
-
Packages by year (2025, 2026)
-
Destination Wedding Packages
-
Ceremony + Reception Only
-
Photo & Video Packages
Managing Packages
Click on a collection to view all the packages within it. For example, in 2026 Packages, you might see:
-
Standard Package: Includes [list items].
-
Preferred Package: Includes [list items].
-
Premium Package: Includes [list items].
You’ll also find any à la carte add-ons for the collection.
Customizing Packages
Within each package, you can:
-
Drag and drop items to reorder them.
-
Add prices, descriptions, and package details.
-
Copy, edit, or delete packages easily.
Why Packages Matter
When you send a proposal, you’ll select from these packages to share your services and pricing with your clients. Setting up your packages here ensures your proposals are clear, consistent, and ready to go.
The Packages section is intuitive and fully customizable, making it easy to create, adjust, and organize your offerings to match your business needs.
Contract
The Contract section within Templates helps you create a professional contract that’s linked to your proposals for a seamless user and client experience.
Setting Up Your Contract
Follow these steps to create the perfect contract for your couples:
-
Add a Header Image: Upload an image to appear at the top of the contract. Your logo will be included here as well.
-
Set a Payment Schedule:
-
Choose the number of payments and assign percentages for each.
-
Schedule payments relative to the booking date or the event date.
-
-
Select or Create a Contract:
-
Use one of Lemlii’s two contract templates as a starting point (note: Lemlii is not liable for the contents of these templates).
-
Or, create a custom contract by entering your own text.
-
-
Styling like colors and button shapes are automatically pulled from your main Branding settings. (Settings>Business>Branding)
Payment Tracking and Statuses
The payment schedule on the contract updates dynamically based on the statuses of each payment:
-
Overdue: Payment has not been received and is past the due date.
-
Due: Payment is due within the next 7 days.
-
Pending: Payment is due in more than 7 days.
-
Partial: A partial payment has been made.
-
Paid: The payment has been made in full.
When you, as the Lemlii user, mark a payment as paid, the status will automatically update on the client’s contract.
Stripe Integration
If you link your Stripe account to Lemlii:
-
A Pay button will appear next to each payment in the client’s contract.
-
When a client pays via Stripe, the status is automatically updated.
If Stripe is not linked, the Pay button will not appear, and payments must be tracked manually in the bookings tab.
Why Contracts Matter
Your contract is linked to proposals:
-
When you create a proposal for a specific lead, the contract you set up here will automatically be included.
-
You’ll also select the packages to include in the contract, tying everything together in one streamlined process.
By setting up your contract, you'll ensure everything is professional and ready to share with your clients.
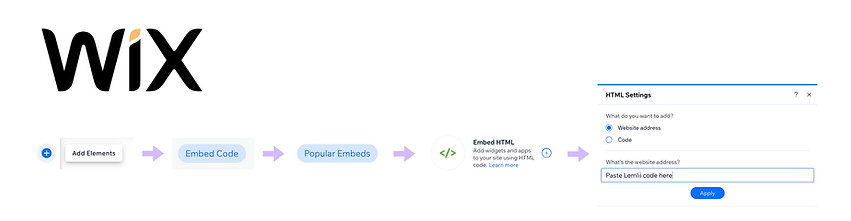
Inquiry Form
The Inquiry Form feature lets you easily collect leads by embedding a customizable form into your website and social media platforms, such as your Instagram bio.
How It Works
-
When a potential client submits the form, their information is automatically added to your Leads tab in Lemlii.
-
You’ll also receive an email with the full details of the inquiry.
Customizing the Form
-
The only field currently editable is the bottom field, though more customization options are planned for the future.
-
Add a redirect link to send clients to a specific page after they submit the form (e.g., a thank-you page or portfolio).
-
Styling like colors and field shapes are automatically pulled from your main Branding settings. (Settings>Business>Branding)
Embedding the Form
-
The form is embedded using an HTML code, making it simple to add to your website.
-
For Instagram, simply copy the form’s link and paste it into your bio—it’s that easy!
See a step by step visual for Wix and Squarespace below -
The Inquiry Form is a powerful tool for capturing leads and seamlessly integrating them into your Lemlii workflow.

Questionnaire
The Questionnaire feature helps you easily gather detailed client information after booking using customizable templates stored right within Lemlii.
How It Works
-
Set up your standard questionnaire in the Templates > Questionnaire section.
-
When you get a booking, go to that client's profile and click the Questionnaire button within the booking details.
-
This generates a unique questionnaire for that client based on your template.
-
A unique link is created for you to send to your client.
-
You can pre-fill any information you already know; it saves automatically.
-
When your client submits the questionnaire, you'll receive an email notification.
-
The completed information is stored within the client's profile
-
Submitted questionnaires can still be edited after being sent by confirming via a prompt.
Setting Up Your Template
-
Navigate to Templates > Questionnaire.
-
A default template is provided so you don't have to start from scratch.
-
Edit and rearrange fields to build your ideal questionnaire flow.
-
Styling like colors and field shapes are automatically pulled from your main Branding settings. (Settings>Business>Branding)
Using Questionnaires with Clients
-
Generate a client-specific questionnaire by clicking the Questionnaire button in their Booking.
-
Optionally, customize this specific questionnaire further for individual client needs (this won't change your master template).
-
Copy the unique link generated and send it to your client.
Automations
Lemlii’s Email Automations allow you to schedule reminders and follow-ups to yourself based on key project triggers. These are not client-facing messages — they are internal reminders sent to your inbox, keeping you proactive and organized without losing the personal touch.
Why It Works This Way
Unlike other platforms that fire off canned emails directly to your couples, Lemlii gives you full control. You receive the email, complete with the client’s contact info, wedding details, and any dynamic data you’ve inserted. From there, you can make quick adjustments if needed - or forward it directly to the client with one click.
This approach ensures:
-
No emails get sent without your knowledge
-
You can personalize messages before they’re delivered
-
You stay in the loop on key deadlines and client updates
1. Create Email Templates
Your email templates appear in the left column of the Automations page.
-
Click Create under the Emails section
-
Write your subject line and message body
-
Use dynamic placeholders like <firstName1>, <eventDate>, <projectLink>, etc.
Best Practice:
Include <firstName1> and <firstName2> in the subject line so you can immediately tell which couple the reminder is for when it arrives in your inbox.
Templates can be edited at any time and reused across multiple automations.
Built-In Button Templates (Top 4)
You’ll notice the top four templates on the left side are separated by a thin yellow line. These templates are linked to Lemlii’s built-in product actions — such as:
-
Sending an inquiry response (2 options)
-
Delivering a proposal
-
Sharing a video gallery
These are different from scheduled automations and are triggered by your direct interaction with the platform.
2. Attach a Template to an Automation Trigger
In the right column, you’ll set up a trigger that tells Lemlii when to send the email.
-
Click Create under Automations
-
Choose a trigger (e.g. “7 Days Before Payment Due” or “1 Day After Wedding”)
-
Attach your chosen template
Once created, Lemlii will send you that email at the scheduled time with the client email included at the bottom for easy forwarding.
Built-In Templates and Triggers
Lemlii comes with 16 pre-built email templates — already written and timed for common workflows like:
-
Proposal reminders
-
Payment due follow-ups
-
Questionnaire links
-
One-month-out wedding prep
-
Gallery expiration reminders
-
Post-wedding thank-yous
These are ready to use with no setup required but can be customized any time.
Template Availability and Locking
-
You can only assign a template to one automation
-
If a template is already attached to an automation, it won’t be selectable when creating another
-
Used templates are marked with an orange checkmark so you can quickly see what’s active
Scheduled Automations Log
At the bottom of the Automations page, you’ll see a Scheduled Automations Log.
This log shows:
-
Every email scheduled to be sent
-
Emails that have already been sent
-
The ability to click on a date to filter and view scheduled messages for that day only
This makes it easy to stay on top of what’s coming up and track what’s already been handled.
Additional Notes
-
Each automation email is sent once per trigger unless duplicated manually
-
You can edit, delete, or toggle automations on and off at any time
-
Emails are sent to your Lemlii account email, not the client’s
-
Every message includes the client’s email address for easy access or forwarding
-
The <clientInfo> dynamic field includes all info related to the couple (info, package, invoice, questionnaire, notes, inquiry message ext.)


<object data="YOUR LEMLII LINK HERE" type="text/html" width="100%" height="1200px"> Your browser does not support embedded objects. </object>


Financials
Transactions
The Transactions page helps you stay on top of your finances by organizing everything into three clear categories: Expenses, Sales, and Payments. Whether you're manually recording a gear purchase, logging a sale, or reviewing payments received, this page keeps it all in one place.
How It Works
-
Record expenses or sales manually — Add key details like item, amount, and payment method (credit, cash, etc.).
-
Attach receipts — Upload photos for visual documentation and easier reference.
-
Set recurring transactions — Ideal for ongoing monthly or yearly costs.
-
Track payments automatically — Any payment received or recorded elsewhere in your account will show up here without extra steps.
-
See it reflected in your Dashboard — Every transaction instantly updates your dashboard, giving you a clear, real-time snapshot of your financial activity.
-
Export your data anytime — Easily download all transactions for accounting or tax season.
The Transaction page makes it easy to organize and track your finances, and syncs directly to the blue graphic on your dashboard.
Invoice
The Invoice tab helps you stay organized and track all payments from your clients in one place.
How It Works
-
When a couple books with you, an invoice is automatically created and added to the Invoice tab when a proposal is sent for wedding jobs.
-
For non-wedding work, invoices can be created manually within this tab.
-
The invoice page allows you to view all your invoices' statuses, including:
-
Outstanding invoices: Payments that are still due.
-
Overdue invoices: Payments past their due date.
-
Total paid: All payments you’ve received.
-
Completed invoices: Fully paid and finalized invoices.
-
-
Keep track of payment statuses as couples pay their deposits or other installments using the same status icons from the proposals:
-
Pending: Due in the future.
-
Due: Due within the next 7 days.
-
Overdue: Payment is past its due date.
-
Partial: A partial payment has been made.
-
Paid: The payment has been made in full.
-
Creating Invoices
-
Automatically generated for wedding jobs when proposals are sent.
-
Manually created for non-wedding commercial jobs directly within this tab.
The Invoice tab gives you a clear, streamlined view of your finances, ensuring you never lose track of payments or outstanding balances.
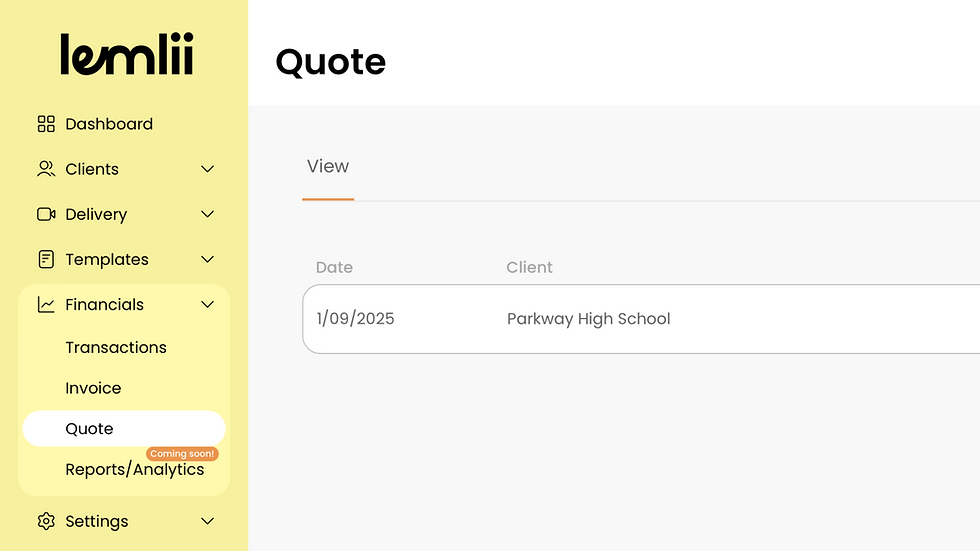
Quote
The Quote page allows you to create and customize professional quotes, designed mainly commercial applications.
How It Works
-
Generate a detailed quote outlining your services and pricing.
-
Customize quotes based on the client’s needs before finalizing.
-
Download a printable PDF version of the quote to send to your client manually.
The Quote page is a standalone feature, and not integrating to anything within Lemlii.